TranscriberAG
a tool for segmenting, labeling and transcribing speech
TranscriberAG user manual
This manual contains the following parts:
- Getting started: describes how to start a TranscriberAG session and details main user interface elements
- Windows shows the main elements of TranscriberAG
- Main window
- Menu and tool bars: describes the interface top elements
- File explorer: describes the file explorer tree features
- Annotation editor: describes the annotation editor features
- Annotation file properties: describes the file properties dialog
- Speaker dictionary: describes the global and local speaker dictionaries
- Configuration describes TranscriberAG configuration parameters
- Shortcuts summary is a reminder of all TranscriberAG shortcuts.
Getting started
How to launch TranscriberAG?
You can start TranscriberAG in the following ways:
- Desktop launch icon (Windows only by default): double-click on the TranscriberAG icon;
- Command line: TranscriberAG (under Linux TranscriberAG --help will display command line options).
Welcome screen
When you first start TranscriberAG, you will be prompted to define an identifier.
This identifier will be afterwards used to tag annotation files you create or edit.
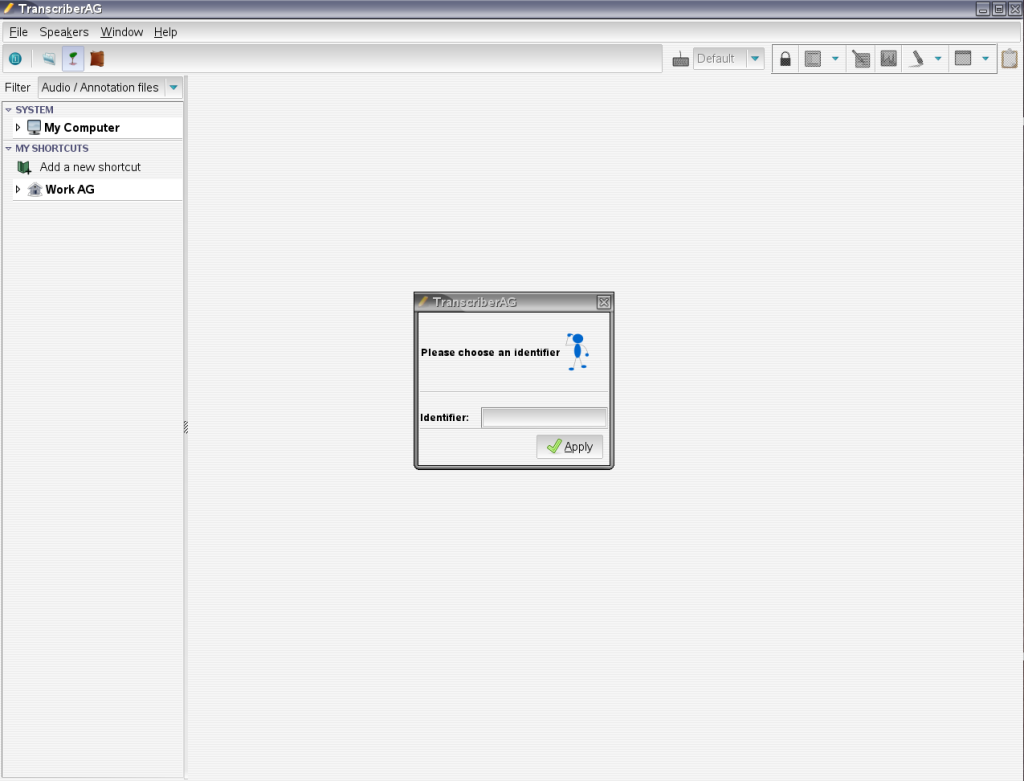
This happens only once: after you'll be taken directly to the Main window
>> Back to menuWindows
Main window
Screenshot
Following is a screenshot of TranscriberAG before any file has been opened:

Description
TranscriberAG main window contains the following elements:
- at the top, the Menu and tool bars through which all editing actions can be activated.
- the File Explorer Tree is displayed on the left side. It's a file browser through which one can select files to open in TranscriberAG.
- the main part of the window contains a notebook in which Annotation Editor windows will be opened. Those editors are divided in two parts:
- the Text Widget through which one can input annotations,
- the Audio Widget giving access to signal control.
Usually, the first thing to do after opening TranscriberAG is to open an audio file (to create a new annotation file) or to open an existing annotation file.
To do this, you can use the menubar, the toolbar or the <ctrl+o> shortcut.
The Tool Bar can be easily shown or hidden using the <ctrl+k> shortcut, and the Explorer Tree with the <ctrl+j> shortcut.
>> Back to menu
Menu And Tool Bars
Screenshot

Description
All TranscriberAG functionalities are accessible through:
- the Menu Bar gives access to all possible actions of TranscriberAG. It's composed of the following tabs:
- the Tool Bar allows quick access to the most useful functionalities through buttons.
The Menu Bar
You can display menu items and activate them with the mouse, or using <Alt>+<letter> generic shortcut, where <letter> identifies an underlined letter in corresponding menu label (eg. <Alt>+f to open "File"menu items)
Some actions are associated with a keyboard shortcut. This shortcut is indicated next to menu label. A reminder of all keyboard shortcuts is given in Shortcuts Summary section.
When there is no open file, the only actions available are: open a file, open the general speaker dictionary and configure the display, and the menu bar shows as follow:
When a file is open, then all editing actions become available, and the menu bar shows as follow:


All available menu actions are described below.
File menu
File menu allows basic operations on file.

|
Open opens a file selection dialog box, allowing to select the file to open. |

|
Create a new transcription allows to create a new transcription thanks to audio file(s). |

|
Recent files allows to re-open one of the 10 most recently opened files. |

|
Quit allows to quit TranscriberAG. |

|
Save allows to save the current annotation file. |

|
Save as saves the current annotation file with a new name. A "Save as" dialog box is opened, through which the user is prompted to input file new name or new location. |

|
Close allows to close the current opened file. |

|
Export file allows to export the current opened file in stm/chat/html/txt or user-defined format. |

|
Edit/Read only mode allows to switch within the editor between edit and read-only modes. |

|
Revert file allows to restore file from a recent version: |

|
Revert to saved file restores last saved version of the current file. |

|
Revert to autosaved file restores last autosaved version of the current file (which can be more recent than last saved version). |

|
Refresh refreshes currently opened file and displays current file data. |
Edit menu
Edit menu gives access to basic file editing operations.

|
Undo cancels previous editing action. |

|
Redo redoes a canceled editing action. |

|
Copy copies selected text area from annotation editor to selection buffer. |

|
Paste copies selection buffer contents to annotation editor at current cursor position. |

|
Special paste copies selection buffer contents (including segmentation marks and annotation tags) to annotation editor at current cursor position. |

|
Cut copies selected text area to selection buffer and deletes it from annotation editor. |

|
Clipboard gives access to the edit clipboard actions when the clipboard is opened (shortcut: <alt+shift+c>). |

|
Display/Hide clipboard displays or hides the clipboard. |

|
Previous entry selects the previous entry in the clipboard. |

|
Next entry selects the next entry in the clipboard. |

|
Import in clipboard puts the selected text in the clipboard. |

|
Export from clipboard puts the clipboard selected entry into the editor buffer at current cursor position. |

|
Clear clipboard clears all entries from the clipboard. |

|
Suppress clipboard selection erases the selected entry from the clipboard. |

|
input language menu allow to select the input mode for the keyboard. |

|
Next language selects next input language. |

|
Previous language selects previous input language. |
Search menu
The Search menu gives access to Search and Special search features within the annotation editor.

|
Search opens the search bar at the bottom of the window, or the search dialog box, depending on user preferences. |

|
Special search opens a search dialog box that allows to search turns of speech for a given speaker, or sections for a given theme. |
Annotation menu
The Annotation menu gives access to
Annotation Actions.
These actions may vary depending on applicable
annotation conventions.
The following menu describes a classical and detailed transcription scheme, with "Section/Turn/Segment" segmentation level and text-anchored events.

|
New section inserts a new section at at current segment start. If no turn exists at segment start, it will be automatically inserted. |

|
New turn inserts a new turn at current segment start. If a turn already exists at segment start, an overlapping turn will be created, after user confirmation. |

|
New segment inserts a new segment for current audio cursor value at current text cursor position. |

|
New event inserts a new event at current text cursor position. New event menu is popped to select annotation event or foreground event type. These menus are configured by applicable annotation conventions, and may look like follows: |

|
Noise inserts foreground noise event (for example breathing, general, conversation, etc). |

|
Pronounciation annotates pronunciation problems (eg. unintelligible). |

|
Language annotates short scope language changes. |

|
Normalization inserts term normalisation (dates, numbers, etc). |

|
Disfluency annotates discourse disfluencies (hesitation, revision, etc). |

|
Comment inserts a comment. |

|
Delete event erases current event. |

|
Edits event properties modifies current event properties (type/subtype). |

|
New named entity inserts a new named entity at current text cursor position. Entity menu is popped to select entity type and subtype. The entity menu is configured by applicable annotation conventions, and may look like follows: |

|
Person annotates a person identification (human, fictional character, other, etc) |

|
Location annotates a geographical location name (town, country, region, other, etc). |

|
Time annotates a time definition (date, hour, other). |

|
Amount annotates an amount (currency, other). |

|
Product annotates a "commercial" product name (vehicle, art, other). |

|
Organization annotates an organization name (non profit, educative, commercial, other). |

|
Unknown marks a scope as unknown. |

|
Geo Socio Politic annotates a geo-socio-political entity. |

|
Facilities annotates a facility. |

|
Other annotates an entity with an indeterminate type. |

|
Delete named entity erases current entity annotation. |

|
Edit named entity properties modifies current entity properties. |

|
New background inserts a new background segment at current signal cursor position. |
Signal menu
The Signal menu allows to interact with the Audio Widget, to pilot signal playback. Most of the menu actions are also available through keyboard shortcuts.

|
Play/Pause starts or pauses the signal playback. |

|
Forward allows to skip forward 3 seconds into the signal. |

|
Rewind allows to skip backward 3 seconds into the signal. |

|
Active track 1 sets track 1 as current track for annotation editor (only for stereo file). |

|
Active track 2 sets track 2 as current track for annotation editor (only for stereo file). |

|
Enable/Disable synchronisation of text cursor with signal cursor. |

|
Enable/Disable synchronisation of signal cursor with text cursor. |

|
Save signal selection saves selected signal portion to file; a file selection dialog is popped. |

|
Goto signal position moves signal cursor to user-input position; an input dialog is popped. |
Text to signal synchronization means that text cursor is automatically moved to (end of) segment annotation text corresponding to current signal cursor position when this position changes, either when the user clicks on the signal waveform or when the signal is played. If text cursor is already set in current segment, it is not moved.
Signal to text synchronization means that the signal cursor is automatically moved to the (start of) segment annotation corresponding to the current text cursor position when this position changes. If the signal cursor is already in the current segment, it is not moved.
Speakers menu
The Speakers menu gives access to global and local Speaker Dictionaries.

|
Global speaker dictionary opens the global speaker dictionary. |

|
File speaker dictionary opens the speaker dictionary defined for current file. |
Window menu
The Window menu gives access to windows visibility menu and application configuration dialog.

|
Show/Hide toolbar shows or hides the toolbar |

|
Show/Hide status bar shows or hides the status bar (located at bottom) |

|
Show/Hide explorer shows or hides explorer's widget. |

|
Preferences button shows Configuration popup. |

|
Enlarge editor display hides the explorer tree and extends the editor zone to occupy the whole TranscriberAG window. |

|
Previous tab button moves to the previous edited file. |

|
Next tab button moves to the next edited file. |

|
Close current page closes current open file. |

|
Display clipboard button displays the Clipboard. |

|
Display file properties button opens the Annotation File Properties popup. |
Help menu
The Help menu gives access to online help features.

|
About button gives information about the current version of TranscriberAG. |

|
User manual button displays this manual. |
Display menu
The Display menu gives access to display options for annotations layout in the text widget.

|
Show/hide tags shows or hides some annotations tags (entities, events, backgrounds, etc) in the text widget. |

|
Enable/Disable highlight activates (or disables) current text segment highlight. |

|
Enable dual display (stereo files) switches between dual and merged display modes. |
The Tool Bar
When there is no file opened, you can just: quit TranscriberAG, open a file, show/hide the explorer or consult the global dictionary.

When a file is opened, then menu bar looks like this:

Tool bar buttons are described hereafter:

|
Quit button quits TranscriberAG . |

|
Open button opens a file. |

|
Save button saves current file. |

|
Close button closes the currently open file. |

|
Refresh button refreshes the text and audio waveform of the currently open file. |

|
Undo button cancels previous editing action. |

|
Redo button restores a previously canceled editing action. |

|
Copy button copies selected text area from annotation editor to selection buffer. |

|
Paste button copies selection buffer contents to annotation editor at current text cursor position. |

|
Cut button copies selected text area to selection buffer and deletes it from annotation editor. |

|
Search button opens Search dialog popup, either as a dialog box or as a tool bar at editor's bottom line; |

|
File Properties button opens the File Properties dialog for the current file. |

|
Show/Hide explorer button shows or hides the File Explorer. |

|
Global speakers dictionary button opens the Global Dictionary. |

|
Keyboard language button allows to set current input language for the keyboard (shortcut: <ctrl+shift+page up/down>). |

|
File locked button Indicates current file editability state: when shown as an open padlock, then current file can be updated. When shown as a closed padlock, then current file is only readable. By clicking on the button, one can change the editability state of the editor buffer BUT NOT OF THE FILE. This is useful to avoid modifying a writable buffer, when browsing it for instance (shortcut: <F6>). |

|
Editor qualifiers tags displayed button allows to show or hide qualifier tags in the text widget (shortcut: <F7>). Clicking on the button allows to hide or display the qualifiers. When hidden mode is on, clicking on the arrow button on the right allows to switch between modes (hide all qualifiers, only events, only entities, etc). |

|
Text synchronized to signal button allows to activate/deactivate automatic positioning of the text cursor relatively to the current signal offset. When shown as illustrated, text is synchronized with signal, which means that text cursor "follows" the signal cursor. When shown crossed with a red line, text is not synchronized with the signal (shortcut: <F8>). |

|
Signal synchronized to text button allows to activate/deactivate automatic positioning of the signal cursor relatively to the current text cursor position. When shown as illustrated, signal is synchronized with text, which means that signal cursor "follows" the text cursor. When shown crossed with a red line, signal is not synchronized with the text (shortcut: <F9>). |

|
Highlight button when activated (shows as illustrated), the current segment of text in the annotation editor is highlighted. When shown crossed with a red line, text highlighting is disabled. For a stereo file with multiple views, one can refine highlighting options by clicking on the arrow button on the right, and select in which view to activate highlight (shortcut: <F11>). |

|
Unique editor button (only with stereo files). Allows to switch between various display modes for stereo files: a single view displaying annotations for both tracks, two "dual" views (one for each track) side by side, a single view for one of the tracks. Clicking on the "terminal" icon allows to switch between single/dual view. When in single view, clicking on the arrow button on the right allows to select between merged/track1/track2 modes shortcut: <F12>). |

|
Clipboard button Show/hide Clipboard window (shortcut: <shift+alt+c>). |
Remark: the classic option icons (such as open, save, copy, paste, etc) depend on the Gtk theme used by your system, and can differ from the pictures of the current page.
>> Back to menu
File Explorer
Screenshot
Description
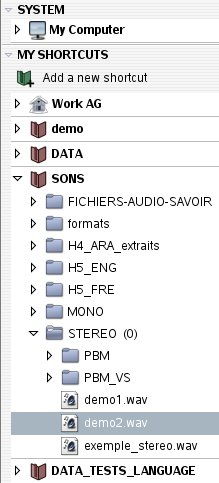
The file explorer tree aims at browsing the file system in order to select and open a file.
The file explorer contains the following parts:
- SYSTEM gives access to local file system when opening "My Computer" tree, starting at system root.
- MY SHORTCUTS gives access to user defined shortcuts allowing direct access to selected directories.
Browsing through trees
Clicking on the ![]() icon left to a tree element or double-clicking on its name allows to open it and display its contents (or close it if it was already opened).
icon left to a tree element or double-clicking on its name allows to open it and display its contents (or close it if it was already opened).
When a branch is opened, its contents are displayed in alphabetical order, according to current filtering rules (see filtering below). Items display an icon according to item type (folder, annotation file, audio file, other type), and the file or folder name.
Right clicking on the root item of a tree pops up the following menu:

|
Refresh refreshes tree display. |

|
New Folder creates a new folder in tree root folder. |

|
Paste pastes previously copied folder in root folder. |
Right clicking on a folder-type item of a tree pops up the following menu:

|
Refresh refreshes current folder display. |

|
New Folder creates a new folder in current folder. |

|
Rename renames current folder. |

|
Copy copies current folder. |

|
Cut copies and deletes current folder. |

|
Paste pastes previously copied folder in current folder. |

|
Add to shortcut opens the shortcut creation dialog with fields correctly filled. |

|
Delete deletes current folder. |

|
Properties displays information on current folder. |
Right clicking on a file-type item of a tree displays the following popup menu:

|
Open opens current file. | ||

|
Create creates a new transcription file (option available only for audio items). | ||

|
Create Multi creates a new stereo transcription (option available only for audio items). | ||

|
Rename renames current file. | ||

|
Copy copies current file. | ||

|
Cut copies and deletes current file. | ||

|
Paste pastes previously copied file in current folder. | ||

|
Delete deletes current file. | ||

|
Properties displays information on current file, according to file type:
|
Using shortcuts
Shortcuts are aimed at avoiding loosing time in repeating file tree browsing by giving direct access to a previously "tagged" directory path.
Creating Shortcuts
Clicking on  button makes the shortcut creation dialog appear:

The target path for the shortcut must be defined in the Target path field.
The name of the shortcut must be defined in Shortcut name field (it is by default set to the target path base name).
The following button:  gives access to the OS standard file browser composed of a file selection dialog through which one can select shortcut target path.
A shorcut can also be created with a right click on a folder thanks to the button "add to shortcut" from the contextual menu.
Using shortcuts
Using shortcuts is similar to using the SYSTEM root tree. Right clicking on a shortcut displays the following popup menu:

|
Refresh refreshes the tree display. |

|
New Folder creates a new folder with name to fill in. |

|
Paste pastes the copied folder in shorcut root folder. |

|
Modify shortcut for modifying the name or the path of the shortcut. |

|
Delete shortcut deletes shortcut. |
Filtering displayed file types
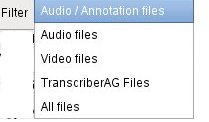
|
The Filter combo on top of the subwindow allows to filter displayed directories contents, to show only files of selected file type:
|
Importable file formats can be configured in the formatAG.rc file (see TranscriberAG Configuration Manual)
>> Back to menu
Annotation Editor
Screenshot
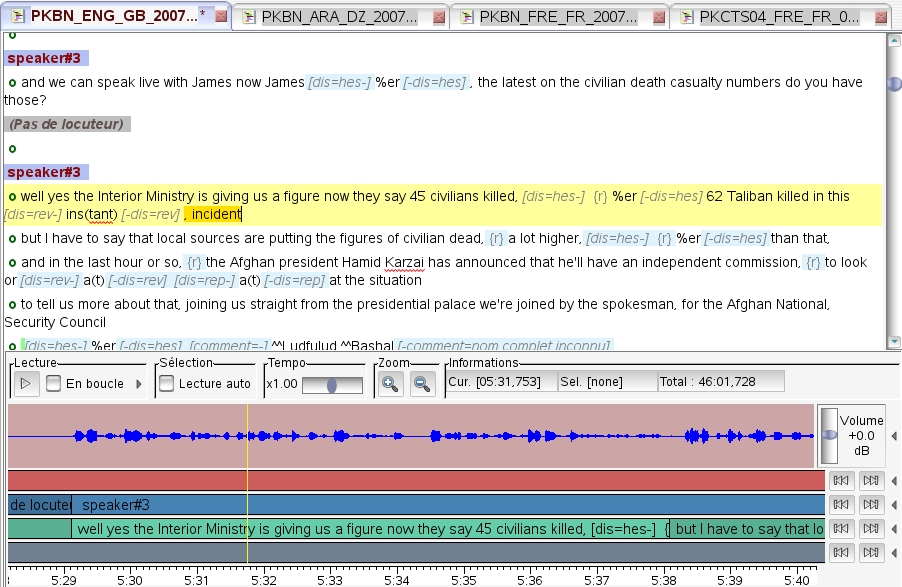
The annotation editor is the TranscriberAG component through which one can create and edit textual annotations on an audio signal (or the audio track of a video signal). The editor window can be composed of several parts:
- The Text Widget supports the display and input of textual annotations for current audio signal,
- The Audio Widget displays information about the audio signal - among which a waveform - and supports user interactions with it.
- Video Widget displays information about the audio signal - among which a waveform - and supports user interactions with it.
This page describes general features of the annotation editor:
- Creating a new annotation file
- Opening or importing an existing annotation file
- Saving or exporting an annotation file
- Automatic backup and revert to saved features
- Synchronized browsing between the annotations and the signal
- Stereo files support
Specific features of the text and audio widgets are described in corresponding pages.
Multiple files support
Several files can be opened at the same time within TranscriberAG. Each file is then loaded in a separate AnnotationEditor, and docked in a notebook, as shown in above screenshot. One can switch to the current file by clicking on the upper notebook label, or pressing <ctrl+PageDown> (go to next page) or <ctrl+PageUp> (go to previous page).
Loaded files gain exclusive access to the audio device only when signal is played. Thus, only one signal can be played at a time, but as soon as current soundtrack is paused, another soundtrack can be played or another application can gain access to the audio device. Reciprocally, if another application uses the audio device, TranscriberAG will not be able to get exclusive access to the device. Depending on how the other application manages audio device locking, pausing the playback within this application may be not sufficient. Stopping the playback may be necessary.
Clicking on the cross icon  next to file name (or using <ctrl+w> shortcut, or File > Close menu option) causes corresponding file to close.
Supported audio file types
TranscriberAG supports the following audio file formats and codecs:
- WAV files, with A-law or u-law codecs (*.wav),
- SUN AU files (*.au),
- Apple AIFF files (*.aiff / *.aif),
- MP3 compressed files (*.mp3),
- NIST sphere files (*.sph),
- and other formats and codecs supported by libavcodec library (among which FLAC, MP2, MP3, RealAudio 1.0, Real Audio 2.0, Vorbis, Windows Media Audio, refer to ffmpeg project home page at http://ffmpeg.org for more informations).
TranscriberAG supports the annotation of stereo files, and provides specific features to ease this task, see Stereo files below.
Creating a new annotation file
When an audio file is opened through the File Explorer (or using the File > Open menu option), TranscriberAG first checks if any annotation file exists for selected signal (lookup being performed on file naming rules).
If not, a new annotation file will be automatically created. The user is prompted to select main transcription language and applicable
Annotation conventions:

Transcription language
The main transcription language defines the default keyboard mode set for text input, and activates the appropriate spelling dictionaries (see Spell Checker feature for the text widget). The current version is configured with the following languages :
- French,
- English,
- Arabic,
- Russian,
- Chinese.
Other latin languages can easily be configured by a corpus administrator (refer to TranscriberAG configuration manual).
Transcription conventions define the way speech transcription should be undertaken :
- signal timeline segmentation: speech segments / turns / sections, background conditions eg.,
- orthographic conventions: words lists (onomatopoeia eg...), spelling dictionary,...
- detailed annotation types of events:foreground noises, disfluencies, ...
- enriched speech annotation: applicable named entity ontology, topic lists,...
Those conventions are usually detailled in a transcription conventions document. TranscriberAG provides mechanisms to enforce and control their application.
Different conventions can be configured by a corpus administrator (refer to TranscriberAG configuration manual for more information on how to configure annotation conventions).
Annotation editor menus and actions will be automatically configured for selected annotation conventions (see Signal Annotation).
The following default conventions are defined:
- transag_default: default (detailed) transcription conventions
- mono_h4_detailed: very close to transag_default; provided for corpus backward compatibility
- stereo_h5_detailed: very close to transag_default, with forbidden overlapping turns. This is provided for corpus backward compatibility
Confirmation popup
OK button validates new file creation. A new annotation graph is initialized for selected annotation conventions, containing basically one segment for each segmentation level. The user can then create new annotations, as explained in Text Widget section.
If Cancel is selected, new file creation is aborted.
If an existing annotation file can be found for selected signal file, then the user is prompted to confirm new annotation file creation or use existing file:
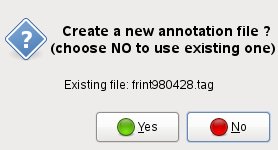
Yes button validates new file creation, whereas No button will cause existing file (which name is displayed in dialog) to be loaded in the editor.
>> Back to menu
Opening an existing annotation file
Opening a TranscriberAG ".tag" file
When a TranscriberAG annotation file (generally suffixed ".tag") is opened through the File Explorer Tree (or using the File > Open menu option or <ctrl+o> shortcut), TranscriberAG loads annotation and corresponding signal files in a new annotation editor session.
Signal file lookup is done with respect to signal file name stored in the annotation file. If signal full pathname isn't defined, then TranscriberAG first looks in the annotation file parent directory. If not found, then it looks in the default directory for audio files defined in configuration parameters. If not found, then it prompts the user to manually select the signal file:
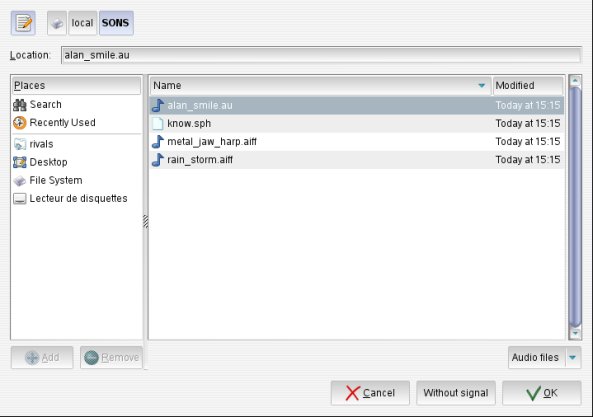
If a signal file is selected, its path is stored in annotation file, allowing its automatic reload next time annotation file is reloaded. To avoid sound association press Without signal button; annotation file is still opened but displays only textual annotations.
File editability

|
File locked button in the Toolbar indicates current file editability state: when shown as an open padlock, as illustrated, then current file can be updated. When shown as a closed padlock, then current file is only readable. By clicking on the button, one can change the editability state of the editor buffer BUT NOT OF THE FILE. It can be useful to lock current file to avoid unwanted modifications when browsing into it. |
Importing another annotation file format
TranscriberAG natively supports reading the following annotation file formats:
- "old" transcriber format (*.trs, with DTD trans-13.dtd or trans-14.dtd)
- NIST STM (Segment Time Mark) format (*.stm)
- NIST CTM (Conversation Time Mark) format (*.ctm)
- NIST Childes format (*.cha)
- NIST mdtm data (*.mdtm), limited to speakers information
- NIST SCLITE alignment data (*.sgml)
If any file of one of these formats is opened in TranscriberAG, it is "on the fly" converted to TAG format and displayed in a new annotation editor. It can then be edited.
Except for SCLITE format, some command-line tools are also provided to convert files to TAG format (trs2tag, chat2tag, ctm2tag, stm2tag, mdtm2tag,...).
Other file formats can be loaded in TranscriberAG if appropriate format support plug-ins are provided.
>> Back to menuSaving current annotation file
Saving in TAG format

|
Pressing the Save button in the Toolbar (or using the File > Save menu option or <ctrl+s> shortcut) saves current annotation buffer contents to TAG file format. |

|
Using File > Save As menu option opens the an open dialog to allow the user to input a new file name. |
Remark: Save option when the current edited file has not been saved yet and a file with same name already exists.
Exporting to another file format
TranscriberAG natively supports exporting annotations to the following annotation file formats:
- NIST STM (Segment Time Mark) format (*.stm),
- HTML,
- Plain text,
- NIST Childes format (*.cha),
- User defined format.
Due to the modeling restrictions inherent to each format, some information losses may occur during conversion.
Some command-line tools are also provided to convert files from TAG format (tag2chat, tag2stm, tag2html, tag2txt, ...).
Other file formats can be loaded in TranscriberAG if appropriate format support plug-ins are provided
>> Back to menuAutomatic backup and revert to saved
TranscriberAG automatically backups any edited file at a given period (which can be configured, see Configuration section).

|
Should current editing session crash, then automatic backup restoration will be proposed next time file is opened |
File > Revert file > Revert to saved file menu option allows to revert buffer contents to last saved version of current file, canceling all edit actions done since. Last saved version can be found in file named <file_name>#.
File > Revert file > Revert to autosaved file allows to revert buffer contents to last automatic backup of current file (which is generally more recent than last save). Auto-saved files are periodically saved in file named <file_name>~. Autosave period is configurable (cf. Configuration > General Configurations).
>> Back to menu
Synchronized browsing through textual annotations and signal
The following toolbar buttons allow to manage text and signal synchronization during file browses.
This allows to set eg. "full synchronization" between text and signal, when manually transcribing an audio file, and to disconnect this synchronization for a quick browse through the transcription text while signal is playing.
It is also possible to activate or inhibit highlighting or tags of current text segment.

|
Editor tags displayed button When activated (show as illustrated) all qualifiers tags are displayed in editor. When shown crossed with a red line, qualifiers hidden mode is ON, and the user can refine hidden mode options by clicking on the arrow button on the right, and select which kind of qualifiers should be hidden. |

|
Text synchronized to signal button allows to activate/deactivate automatic positioning of the text cursor relatively to the current signal offset. When shown as illustrated, text is synchronized to signal, which means that text cursor "follows" the signal cursor. When shown crossed with a red line, text is not synchronized to the signal. |

|
Signal synchronized to text button allows to activate/deactivate automatic positioning of the signal cursor relatively to the current text cursor position. When shown as illustrated, signal is synchronized to text, which means that signal cursor "follows" the text cursor. When shown crossed with a red line, signal is not synchronized to the text. |

|
Highlight button when activated (shows as illustrated), the current segment of text in the annotation editor is highlighted. When shown crossed with a red line, text highlighting is disabled. For a stereo file with multiple views, one can refine highlighting options by clicking on the arrow button on the right, and select in which view to activate highlight. |
>> Back to menu
TranscriberAG supports the annotation of stereo files, and provides specific features to ease this task, such as:
- both channels waveforms display,
- Volume and pitch ajustment independently for each channel,
- Volume cut for one channel while playing,
- Textual annotation display and input for each channel through one "merged" view or through two separate (and synchronized) text widgets displayed side by side.
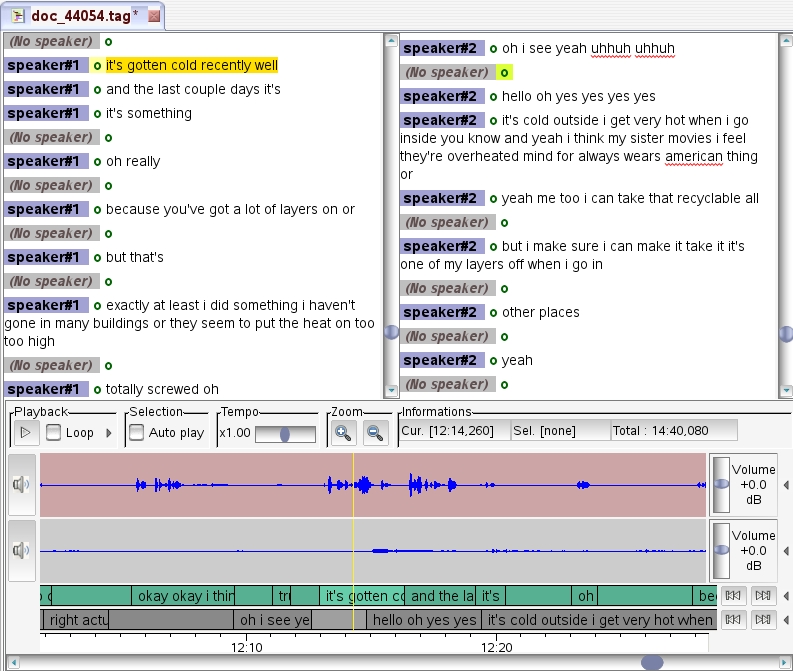
Most of the time, users will find it more practical to use dual text widgets when editing speech transcription.
When just browsing through a conversational-type stereo file transcription, it may be more comfortable to use a "merged" view to get a better overview of the dialog. Speech turns associated to second channel then appear indented, as shown below:
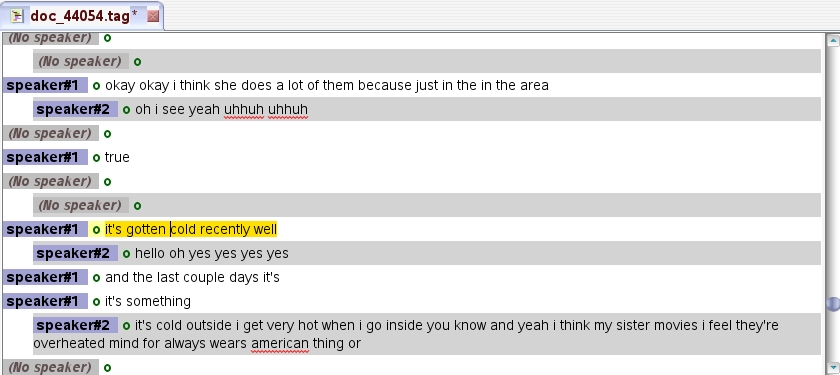

|
Unique editor button in the toolbar allows to switch between various display modes for stereo files:
|
Text Widgets
Screenshot
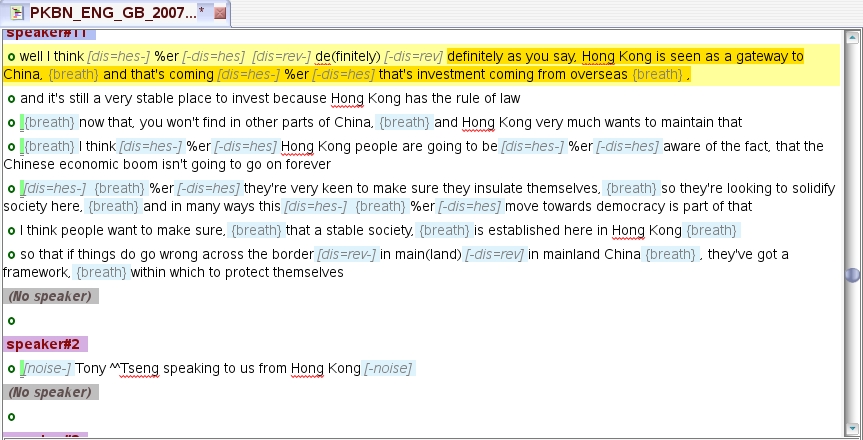
Description
The text widget supports the display and input of textual annotations for current audio signal, typically the segmentation and verbatim transcription of an audio signal.
The text widget offers full UTF-8 support for text input and rendering. Text display uses the native language script, and bidirectionality is well handled.
The input method relies either on internal keyboard mappings, or on common input methods like IME (windows) or SCIM (Linux).
This page describes main editing functionalities:
The following description assumes that a section / turn / segment segmentation scheme is configured for applicable annotation conventions.
|
|
The basic signal segmentation unit is the "segment" which identifies a continuous portion of signal with homogeneous acoustic conditions, holding speech or not. The segment start is materialized in text widget by a green circle - as shown - placed just before the transcription text. | |

|
A "turn" is a continuous sequence of speech segments with the same speaker, including possible short non-speech segments. A turn start is attached to a segment start. A turn start is materialized in text widget by a label - as shown - displaying the turn speaker's name (or "No speaker" when it corresponds to a non-speech signal portion), placed just before the start mark of the segment. | |

|
A section is a continuous set of turns with a thematic homogeneity. A section start is attached to a turn start. Section starts are materialized in text widget by a label - as shown - displaying the section name, placed just before a turn label. Sections can also be used to tag rather long non-transcripted signal parts. |
Those labels are not editable. Contextual menus are associated to each label type.
Turns and segments layouts can be "widespread", as shown in above screenshot, where turns labels are isolated on a separate line. They can also be more compact, with turns labels being placed at the start line of the first segment. This is only a matter of presentation, and has no impact on other editor functionalities.
The following screenshot illustrates a "compact" layout for arabic language.
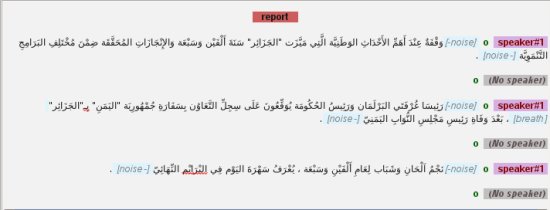
Presentation preferences can be set through TranscriberAG Configuration panel.
Pressing <return> (or using Annotate > New segment menu option) inserts a new segment boundary for the current audio cursor value at current text cursor position.
If the cursor was set at a line end, a new blank line is inserted starting with a segment mark. If text cursor was set within line text, then the text is split at cursor position, and the remaining line goes into a new segment line.
When a splitted segment is enclosed by an event tag, then this event is also splitted, and the new segment is also enclosed by the event tag, as shown:
-
Before split:

-
After split:

The newly created segment is displayed in corresponding segment track in the audio widget.
Adding intermediate timestamps within a segment
It is possible to define intermediate timestamps within a segment, at a word or an event start: place the text cursor at the desired position, place the signal cursor at the desired offset,then press <alt+return> keys, or select Add a time stamp.
A timestamp mark will be displayed in the text buffer, showing the action has been taken into account, as shown below:
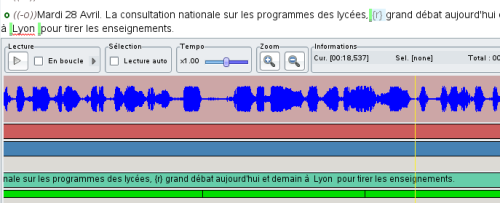
As any other annotation, this timestamp can be modified or deleted through contextual menu options.
Warning : If a qualifier or a foreground event is located at a segment start, the timestamp green mark is displayed before the element tag. This is not an intermediate timestamp (it can't be deleted). It just indicates that the qualifier or the event is linked to the start of the segment:

Pressing <ctrl+t> (or using Annotate > New turn menu option) inserts a new turn anchored at the current segment start. Turn speaker is by default set to the last used speaker. New turn label is displayed at segment start, and turn contextual menu is automatically popped to allow actual speaker name selection.
Pressing <Escape> discards the popup menu. Selecting Delete turn deletes newly inserted turns.
The newly created turn is displayed in corresponding turn track in the audio widget.
Trying to create a new turn on an existing turn will result in an overlapping turn, see below.
Another turn creation modality is provided through the audio widget, see section Creating a new turn for current selection in audio widget description
An overlapping speech turn can be created in two ways:
-
Pressing <ctrl+t> (or using Annotate > New turn menu option) when cursor is set on a segment to which a turn is already attached. The following dialog is then popped:

If "yes" is selected, an overlapping turn label is inserted and and turn contextual menu is automatically popped to allow selection of the current speaker's name. - Selecting Overlapping speech through turn contextual menu. An overlapping turn label is inserted, with the speaker's name set to default.
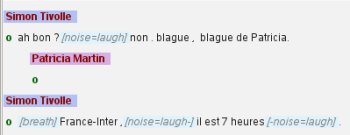
The overlapping turn label and attached segment mark are indented from "base" turn.
When the overlapping turn is created on a turn having 2 speech segments, as shown below, the new overlapping turn will span over the first segment only, "base" turn will automatically be split at first segment end.

--->>> gives --->>> |
|
The newly created turn is displayed in corresponding turn track in the audio widget.
TranscriberAG forbids new overlapping turn creation when one already exists.
Pressing <ctrl+r> (or using Annotate > New section menu option) inserts a new section anchored at current segment start. A section label is inserted before the turn label, and section contextual menu is automatically popped to allow selection of the current section type.
If the segment start doesn't correspond to a turn start, then a new turn is automatically inserted at segment start, and turn contextual menu is also automatically popped after section menu to allow selection of the current speaker's name.
Pressing <ctrl+b> (or using Annotate > New background menu option) inserts a new background anchored at current signal cursor position.
Backgrounds start "((o-))"and end "((-o))" marks are inserted in text widget in corresponding segments, as shown below. The background properties dialog is automatically popped, to allow background type and noise level definition. Background brackets are noted like this:

TranscriberAG offers classical text editing features:
- contextual editing menus for each annotation tag type,
- insert/delete/replace text,
- cut/copy/paste pieces of text,
- special paste inserts previously copied transcription graph part (ie transcription text along with copied segmentation information (segments, turns, sections) and annotated events, entities, etc.),
- cursor moves:
- 1 char left/right with <Left> / <Right> arrows,
- 1 word left/right with <ctrl+Left> / <ctrl+Right>arrows,
- 1 line top/down with <Top> / <Down> arrows,
- go to line start / line end with <Home> / <End> keys,
- go to buffer start / buffer end with <ctrl+Home> / <ctrl+End> keys,
- select characters if <Shift> key is pressed while moving cursor,
When moving the cursor with arrows, TranscriberAG automatically sets it to editable positions (ie. skips non editable labels).
Verbatim transcription of speech segment uses the native language script, and uses the native writing direction, ie left to right (LTR) for most languages, right to left (RTL) for arabic and hebraic languages (yet writing top to down for some asian languages is not supported).
It is possible to mix several languages in the same segment line, TranscriberAG handles properly text display and cursor moves, in particular when switching from RTL to LTR.
It must be noted that there is no need to precisely adjust selections on word boundaries. The event start and end tags will be added before the first word and after last word of the selection range. In particular, defining an event over a single word can be done by just placing the cursor in the word and pressing <ctrl+d>.
Entities annotation is just the same process as event annotation; it can be defined thanks to <ctrl+e> shortcut, or by selecting Annotate > New named entity menu option. Again, the entity contextual menu is popped to allow entity type definition.
>> Back to menuA right-click on the text widget pops up a contextual menu. The contents of this menu vary depending on the item clicked in the text widget. It also varies according to applicable annotation conventions.
All menus are described hereafter.
The following menu is popped when right clicking on text:
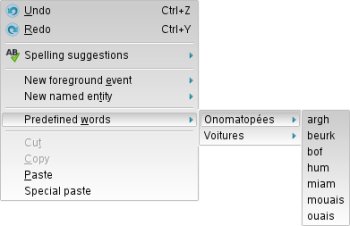
|
|
The following menu is popped when right clicking on a segment start tag:

|
Some corner cases may occur when deleting a segment:
- if current segment is the first one of the file, then deletion is forbidden and a message stating "can't delete first segment" is displayed,
- if current segment if the first one of a turn, then the parent turn is also deleted (see below),
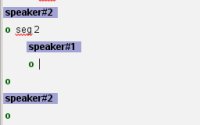
|
It may happen after a deletion that turns and segments layout in text widget seems a bit awkward, as shown (this merely happens when deleting the first turn after an overlapping turn). This as no impact on edition. Use <ctrl+l> shortcut or File > refresh menu option to restore a correct layout. |
The following menu is popped when right clicking on a speaker tag, or when a new turn is created:

|
Some corner cases may occur when deleting a turn:
- if current turn is the first one of the file, then deletion is forbidden and a message stating "can't delete first turn" is displayed,
- if current turn if the first one of a section, then parent section is also deleted,
- If current turn is an overlapping turn, then turn AND its child segments are deleted. Yet eventual transcription text (and associated) events are not deleted, but added at overlapped turn last segment.
 |
It may happen after a deletion that turns and segments layout in text widget seems a bit awkward, as shown (this merely happens when deleting first turn after an overlapping turn). This as no impact on edition. Use <ctrl+l> shortcut or File > refresh menu option to restore a correct layout. |
When <ctrl+d> is used or when a new event is inserted from Annotation menu, a menu is popped: it allows the user to display two submenus, foreground events menu or qualifier events menu.
The qualifier events sub-menu is only available when some text is selected in editor, whereas the foreground events sub-menu will not be reachable if a text selection exists.

The following sub-menu corresponds to qualifiers events (can be popped by right clicking on a qualifier event):
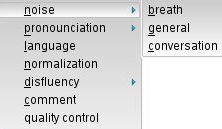
|
|
The following sub-menu corresponds to foreground events (can be popped by right clicking on a qualifier event):

|
|

|
When accessing the contextual menu by right click on an existing event, additional entries are available:
|
When right clicking on an entity tag (or when <ctrl+e> is used), the following menu is popped:
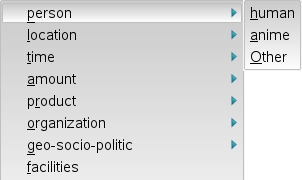
|
|

|
When accessing the contextual menu by right clicking on an existing entity, additional entries are available:
|
>> Back to page menu
Double-clicking on a section tag or selecting Edit section properties in section contextual menu opens the following dialog box, allowing to edit section descriptions. The Language combo allows to set the current input language (by default it is set to "system" language).

Through this dialog, one can also define the main topic associated to current section. Topic is to be seleected from the toimages list defined in current annotation conventions, by clicking on Change button, or let undefined if none is matching current section contents (which can be done with No topic button). A short description of the contents of the section can also be entered.
Selecting Edit turn properties in turn contextual menu opens the following dialog box:
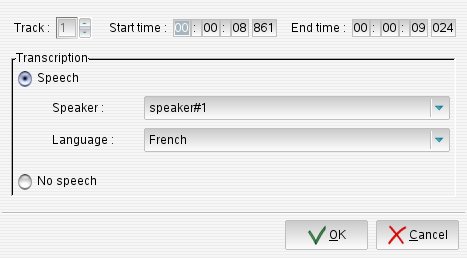
Through this dialog, one can set turn speakers and turn languages.
Pressing <ctrl+b> makes the following popup appear:
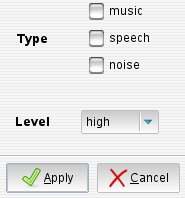
This popup allows to define background type and noise level.
Double-clicking on an event tag or selecting Edit event properties in the event contextual menu (displayed when right-clicking on event tag) opens the following dialog box, allowing to edit event description, with respect to applicable annotation conventions.
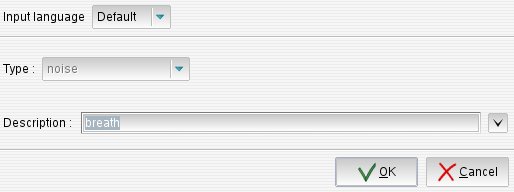
If event type is defined as non-editable, one can only select a new description from predefined subtypes listed in description combo; if it is defined as editable, a free description can also be input. The Language combo allows to set keyboard mapping for event description input (by default it is set to "system" language).
Event type cannot be modified through this dialog. It can be changed by right-clicking on event tag in annnotation editor text widget, and selecting a new type through the contextual menu.
Double-clicking on an entity tag or selecting Edit named entity properties in entity contextual menu (displayed when right-clicking on entity tag) opens the following dialog box, allowing to edit entity description, with respect to applicable annotation conventions.
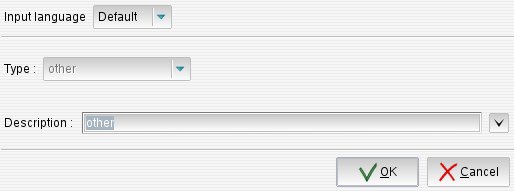
If entity type is defined as non-editable, one can only select a new description from predefined subtypes listed in description combo; if it is defined as editable, a free description can also be input. The Language combo allows to set keyboard mapping for entity description input (by default it is set to "system" language).
Entity type cannot be modified through this dialog. It can be changed by right-clicking on entity tag in annnotation editor text widget, and selecting a new type through the contextual menu.
>> Back to page menuKeyboard mapping and input modes
Keyboard mapping can be set in various ways:
- It is set by default for main transcription language defined for current file,
-
New mapping can be selected through the input language selector
 in the toolbar,
- Pressing <shift+ctrl+page_up> or <shift+ctrl+page_down> shortcuts allows to switch through available keyboard mappings.
Chinese language input is supported via external input methods: SCIM on Linux platforms, IME on Windows platforms.
To enable Chinese input mode, select SCIM mode in the language selector in the toolbar, and select Smart Pinyin in SCIM or IME toolbar (which is generally located in the lower right corner of the display on unix platforms, on the top the the display on windows platform).

Easy switching between Chinese input mode and default keyboard input mode in SCIM is possible with the following keyboard shortcut: press and release <Alt> key then press (left or right) <Shift> key.
Pressing <ctrl+f> shortcut or selecting Search menu activates search function. The search window can be opened in 2 modes:
- in toolbar mode, on the bottom side of main window,

- in dialog box mode, a search dialog popup is opened offering also replace feature.
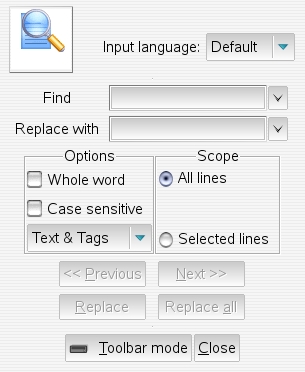
It is possible to switch from one mode to the other by clicking on  button in search toolbar or
  in search dialog. Default mode can be set in TranscriberAG Configuration window.
The keyboard focus is set on search criteria field. Previous criteria can be reloaded by clicking on the arrow right to search criteria.
Clicking on Next button (or pressing <F3> key in toolbar mode) allows to go to next occurrence. Clicking on Previous button (or pressing <shift + F3> key in toolbar mode) allows to go to previous occurrence. If no next or previous occurrence is found, the search criteria background is set to red.
Search options
Checking Whole word checkbox restricts search to whole words only.
The Case sensitive checkbox allows the search to be sensitive or not.
A combo list allows you to specify where searching for the martching term: in edition text, in tags text, or in all text.
The Language combo allows to set the input language specifically for the search criteria.
Specific dialog options
In dialog box mode, extra search and replace options are available.
The Scope options allows to set the searched text range (in whole buffer / in selected text only). If some text is selected when activating search function, then it is set as search criteria.
The Replace with criteria allows to set a replacement string for search string. First occurrence to replace must first be searched using Next or Previous buttons. Clicking on Replace button replaces current occurrence and moves to next occurrence. Clicking on Replace all button replaces all occurrences in buffer.
The Close (or  ) button closes the search window.
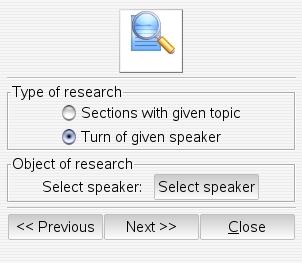
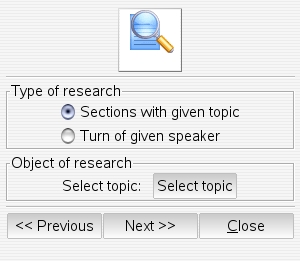
Pressing <ctrl+alt+f> shortcut or selecting Search -> Find/Replace menu activates the special search function.
Special search enables you to search for:
|
Speaker within current file turns Clicking the "Select speaker" button opens the local speaker dictionary list of the curent file |
|
|
Topic within current file sections Clicking the "Select topic" button opens the topic selection dialog |
|
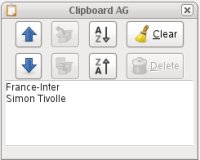
The clipboard stores words or pieces of text, which can be pasted in the text area. This is useful to ease the repetitive input of complex family names or places, for instance, with correct spelling. Text can be imported in the clipboard from a text widget, and exported back from the clipboard to a text widget.
To use the clipboard, it must be opened either by clicking on clipboard icon  in the toolbar, or pressing <shift+alt+c> shortcut. The following window is then opened:
 |
|
Clipboard contents are saved when TranscriberAG is closed, and restored when it is restarted.
TranscriberAG includes an automatic spell checking feature. Spell check occurs when the file is loaded in the editor, and during edits, as soon as a new word input is done or as text cursor leaves a modified word. The chosen speller dictionary is the one corresponding to the main transcription language.
Misspelled words are underlined in red, as shown:  .
.
Spelling suggestions for the misspelled word can be displayed by right-clicking on the word. The text contextual menu is popped, including a Spelling suggestions item. Selecting this item displays the following popup menu:
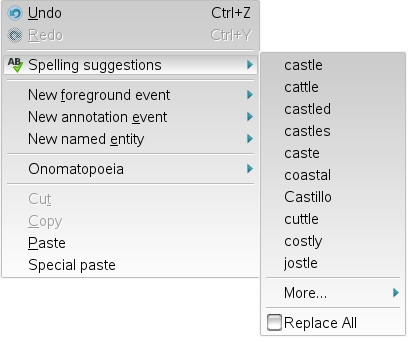
|
A list of words with "close" spelling is proposed. If any word of the list is selected, it replaces the misspelled word in the text view. Some extra options are also available:
|
For some languages, some pre-preprocessing may occur before actual spell checking. In arabic for instance, if words have been input with vowels, then vowels are suppressed before spell checking, as dictionary usually do not contain vowelled words. Therefore, suggested orthographic forms will not contain any vowels either.
>> Back to page menu
Various input modes are supported, depending on target language, see section Keyboard mapping and input modes below.
Detailed annotation consists in adding "events" or "entities" to transcription text. These events and entities are marked by tags. These tags do not require a precise positioning vs signal timeline, and are therefore only "anchored" on text.
Events can be used to annotate some brief acoustic conditions than occur during speech, or eventual pronouncation problems, speech disfluencies, language changes. Entities are used to annotate person or location names, time information, etc., that occur in the text. As a special hack, events can also be used to add comments on transcription text.
The following image illustrates the detailed annotation of a speech segment, with disfluencies and normalisation of some terms. As shown, events appear as light-blue tags noted between square brackets, precising event type and subtype. By default, entities have no background color. Isolated events that do not overlap speech parts are noted "[ event ]". Events and entities that overlap one or more words are noted "[ event_start -] words [- event_end ]".

Isolated events can be then inserted at segment start or end, or between two words by placing the cursor at the right position and pressing <ctrl+d> shortcut, or selecting Annotate > New event menu option. The event contextual menu is then popped to allow event type definition, and an event tag will be added at current cursor position.
To define an overlapping event, one must select overlapped words, and press <ctrl+d> shortcut, or select Annotate > New event menu option. Again, the event contextual menu is popped to allow event type definition.
Audio Widgets
Screenshots
- The audio widget displays for a mono-channel signal:

- The audio widget displays for a stereo signal (showing only speech and background segments):
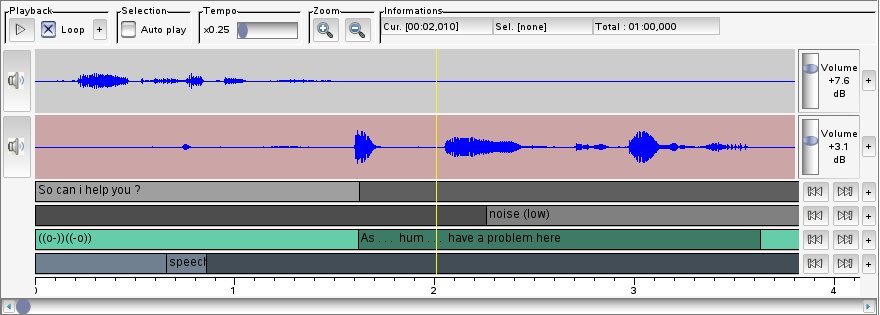
The audio widget contains, from top to bottom, a Toolbar, giving access to main playback actions, Audio Tracks, representing the signal's waveform, optional Segment Tracks, showing various levels of signal segmentation, and a time scale showing current displayed timeline range.
The scrollbar at the bottom of the widget gives indication of the overall signal length and allows to scroll within the signal.
Remark: When audio is playing, using the scrollbar causes conflicting behaviour with the automatic synchronization. It is recommended to use it only when audio is not playing.
All the tracks are synchronized along the same timeline. The cursor (in yellow) is common for all the tracks, and represents current playback position.
The controls in the top toolbar apply to all tracks. The side controls of each track apply to corresponding track only.
The user interface elements of the audio widget are detailed hereafter following this plan:
The toolbar contains the following controls and information:
 the Playback frame contains signal playback controls.
- Play/pause button
 starts or stops playing signal from current cursor position. (also possible using <escape> shortcut).
- Loop checkbox enables or disables playing in loop when reaching the end of the signal or the end of a selection.
-
More options button
 gives access to more playback options:
-

- Extra playback options
- Delay field allows to set a delay (in seconds) for playback before looping.
- Only speech checkbox enables or disables playing only speech segments.
-
The close button
 collapses extra playback options frame.
 Selection frame checkbox enables or disables automatic playback of signal selection. If automatic playback is on, selected signal portion will be played as soon as mouse button is released, either when selecting a signal part from the waveform or by clicking on a segment track to select corresponding signal part.
 Tempo frame contains tempo controls. Tempo modifies "on the fly" playback speed without altering pitch.
- Tempo ruler adjusts tempo factor from 0.25 (4x slower) to 4 (4x faster).
- Reset shortcut <ctrl+left click> on tempo ruler resets tempo factor to 1, normal tempo.
 Zoom frame contains zoom controls for the waveform display.
- Zoom in (+) button doubles waveform resolution for each click. The highest zoom is a TranscriberAG configuration parameter, set by default to 1 millisecond by pixel.
- Zoom out (-) button divides waveform resolution by 2 for each click. The lowest zoom level displays the entire timeline.
 Informations frame displays general information on signal.
- Time display format is "minutes:seconds:milliseconds".
- Cursor item displays current signal cursor position.
- Selection item displays the length of the current selection if any.
- Total item displays the total length of the timeline.

The Signal waveform displays signal peaks along the timeline. When working with a multi-channel audio file (or when 2 synchronized signal files are annotated), a waveform is displayed for each audio channel, as illustrated above.
Current audio cursor position is materialized by a yellow vertical bar. Cursor position is common to all tracks. When playback is started, the signal is played from current cursor position. A left-click on the waveform allows repositioning of the cursor.
The audio cursor defines the playback start point. It can be set by:
- clicking on desired position on the waveform,
- clicking on a segment (or a turn, section, background). Cursor is set at element start.
- or selecting a segment, or moving to previous or next segment,
- using the <F1> "rewind" or <F4> "fast forward" keys which allow to go back/advance in timeline by a (configurable) amount of time (3 secs by default) while playing.
When signal to text synchronisation is enabled, the audio cursor will also be automatically moved to current segment start when the text cursor is placed on a new segment.
A selection can be set up by maintaining the left mouse button pressed while dragging the mouse on the waveform. The selection is materialized by a darker area. Selection duration is displayed in a small popup window and refreshed while moving cursor. This popup vanishes when cursor is placed outside the selection, and redisplayed when cursor is placed on the selection.
Current selection can be canceled by clicking on the waveform.
Creating a new turn for current selection
Select a signal portion, right-click on selection, and select the New turn option in the contextual menu. This will insert a new segment and a new turn for selected signal part, accordingly adjusting existing segments and turns:
- "original" segment and turn corresponding to signal selection start are terminated at selection start (we'll call "original segment end" its end offset before truncation occurs)
- New segment and turn starting at selection start and ending either at selection end, if lower than original segment end, else at "original" segment end, are inserted. New turn speaker is set to default speaker. If text cursor was set before original segment text line end, then all textual annotations up to line end are attached to new segment.
- if new segment end is lower than "original" segment end, another segment and turn are inserted, having the same properties as the "original" ones, starting at new segment end and terminating at "original" segment end.
Using New no speech turn option will have the same effect, but will set the turn speaker to "No speaker".
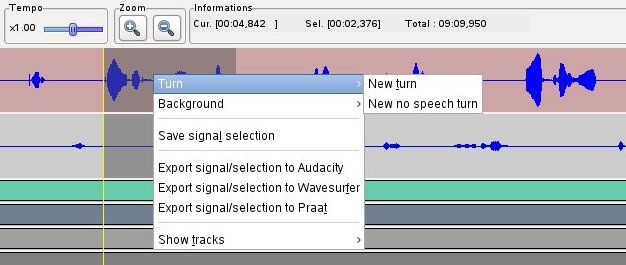
This feature complements the text widget Annotate > New turn menu option (<ctrl+T>), and should be preferred for scarse speech signals (like conversational recordings), when it is easy to visually identify speech segments through the waveform. It can then be useful to increase the waveform with the vertical zoom to enhance speech segments identification, see Audio widget track controls section.
When creating a new turn, transcription text for the current segment can be split at current text cursor position, with the text corresponding to the end of line being attached to the newly inserted segment.
Creating a new background from cursor or for current selection
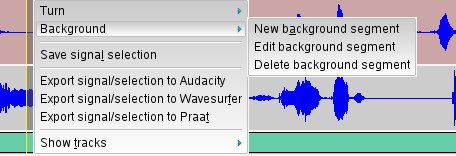
Set the cursor within the signal or select a signal portion, right-click on the waveform, and select New background option in the contextual menu; this will insert a new background starting at current cursor position, ending at:
- selection end, if any,
- next background start, if no selection or lower than selection end
- signal end
accordingly adjusting existing backgrounds.
Through this menu, you can also edit selected background properties, or delete selected background.
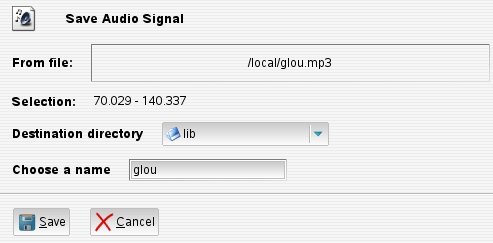
Save signal selection option of the contextual menu displayed when right-clicking on a selection offers the possibility to save the selected signal part to a file, in wav format. The dialog below is popped, allowing to define a destination file.
Export signal/selection to an external tool
Export signal/selection to ... options of the contextual menu displayed when right-clicking on a selection offers the possibility to save the whole signal (or selected signal part if any selection active) to a temporary file, in wav format, and automatically start chosen tool for this temporary file.

The Volume ruler allows to adjust volume factor from -14dB to +14dB, independently for each track.
The  button left to the waveform allows to cut/restore volume for corresponding track (when volume is cut, track waveform is dimmed and speaker button is shown crossed with a red line).
The expander button  right to the volume control allows to show or hide more track controls:
 (Audio tracks controls expanded)
- The Pitch ruler allows to adjust signal pitch from 0.4 (2.5x lower) to 2.5 (2.5x upper).
- The VZoom ruler allows to adjusts vertical zoom (i.e. the amplitude) of the waveform.
- The Offset field allows to define an offset (in seconds) to apply to corresponding audio track, relatively to other tracks, when both tracks recording start are desynchronized. Setting a positive offset makes the signal play later for this track, while a negative makes the signal play sooner. 0 cancels the offset. A click on the "Update" button applies the offset.
-
The
 button collapses the extra controls frame.
The following image shows section, turn and speech segments tracks, with an overlapping turn.

The segment area displays signal segmentation along the timeline, for the different levels of segmentation configured for current annotation conventions, typically a section / turn / speech segment scheme, as shown above.
Each track corresponds to a given level. Segments are drawn with respect to their position and size, taking into account current zoom level. Segment labels contain the section title for sections, the speaker name for turns, the transcription contents for speech segments.
When the cursor is placed upon a segment, the segment label is displayed in a popup window, which vanishes when cursor is moved (this allows to display segment contents even at zoom levels where they are not or partially visible).
Current audio cursor position is materialized by a yellow vertical bar. When the cursor reaches a segment, this segment is displayed more brightly.
When some overlapping segments have been defined, they appear stacked in segment tracks, as illustrated in above screenshot. Thus it is fairly easy to retrieve visually overlapping segments in a file by scrolling the audio widget.
Controls on the right of each segment track allow to move the audio cursor backward  or forward
  to the next segment boundary.
The expander button  gives access to extra options controlling playback behaviour when reaching a segment end:
 Extra playback controls for segment track
- The delay field allows to force a playback pause for given delay when reaching a segment end, before resuming play.
- If stop is checked, playback will stop when reaching a segment end.
-
The
 button collapses the extra controls frame.
Segment boundaries can be graphically adjusted through the segment tracks. Two methods can be used to move a boundary:
- Place the mouse pointer on the segment boundary, and hold mouse left button pressed while dragging the mouse pointer toward new segment position, then release the button,
- Set the (yellow) audio cursor to target position, place the mouse pointer on the segment boundary, and hold <Control> key while clicking on the boundary; the clicked boundary will then be automatically moved to the previously set cursor position.
The latter method generally proves to be more efficient and permits to place with a single click the boundary with accuracy to the current cursor position, which can have been set in different manners, e.g. :
- one can precisely position the cursor within the waveform, following its shape (at a signal peak start e.g.)
- one can play the signal and interrupt playback at a precise position
- cursor can be set to a precise timecode using "go to signal position" function(cf. signal menu)
When the mouse pointer is placed on a segment boundary, its shape changes, indicating that the boundary can be grabbed and moved. Depending on current window manager theme, the pointer may look like a double-arrow, or like a left-oriented or right-oriented arrow.
While dragging a segment boundary, it may happen that a "grey" zone appears between the two segments, because the neighboring segment hasn't been yet redrawn up to the new boundary. This has no impact on the final result, as the neighbor segment will be accurately displayed when the mouse button is released.
When the moved boundary corresponds also to an upper level segment track boundary (e.g. a speech segment boundary which also marks a turn boundary), then tied boundaries are moved together.
Clicking on a segment automatically selects corresponding signal portion.
|
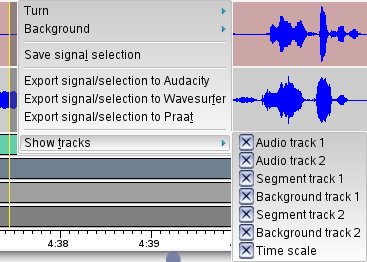
Through the Show signal tracks submenu displayed when Right-clicking on audio widget, one can select which tracks should be displayed. A "checked" tracks is displayed, an "unchecked" isn't. |
Video Widgets
Screenshots
 |
 |
Description
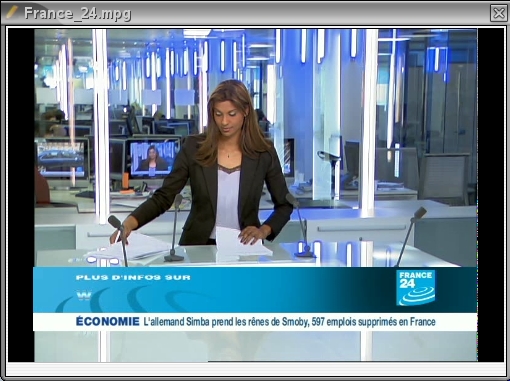
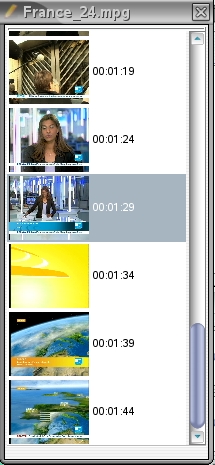
The video widgets are displayed when opening a video file or a transcription file using a video media.
The video part is composed of two floatting windows:
- the video player displays the video. Navigation inside video media is controlled by the audio widget
-
the frame browser extracts N frames per second (see video configuration page for setting extraction step) and displays them for enabling a quick overview and easy navigation.
Remark: When media is playing, using the frame browser scrollbar causes conflicting behaviour with the automatic synchronization. It is recommended to use it only when media is not playing.
Both player and browser are fully synchronized with each other and with audio widget.
It is possible to hide player or browser, or both of them:
- Ctrl+F1 (or menu Video -> Show/Hide video panels): hide or display all video widgets of the current file
- Ctrl+F2 (or menu Video -> Show/Hide video player): hide or display the video player of the current file
- Ctrl+F3 (or menu Video -> Show/Hide video browser): hide or display the video browser of the current file
REMARK: in the Windows version, the windows manager seems to prevent TranscriberAG to be minimized when the video windows are displayed. A workaround of this issue is to hide the video windows (Ctrl+F1) before minimizing.
>> Back to menu
Annotation File Properties
Screenshot
Description
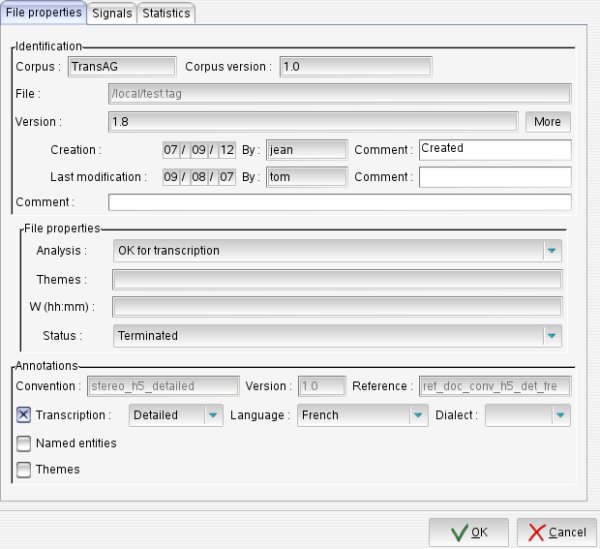
The annotation file properties window displays information about the current annotation file.
The File properties page gives general information about the current file:
- File identification:
- file path, related corpus,
- file versions information: current version id, creation and last modification dates and author, optional comment. Author and comment can be edited. The More button gives access to complete version history (file version history, transcriber id, modification date and activity time).
- File properties depend on applicable annotation conventions.
- Annotations bloc informs about the used convention and allows to specify some transcription details (like annotation language).
The Signals page gives information about current annotated signal:
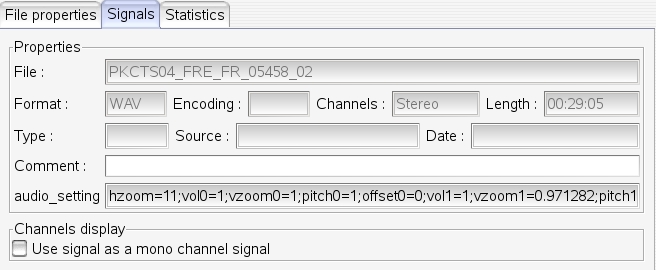
- signal file path,
- file format, encoding, number of channels and duration,
- some meta data that can be edited: recording type (mainly broadcast / conversational), source and date,
- an optional comment,
- last saved audio display settings(volume, vertical zoom, horizontal zoom, pitch)
- option for hiding a signal track (available for stereo only)
The Statistics page gives some statistics about the current annotation file:
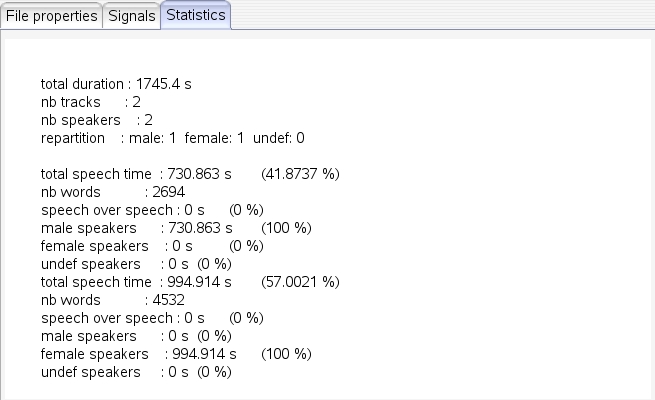
>> Back to menu
Speaker Dictionary
Overview
TranscriberAG supports two levels of speaker dictionary:
- The File Speaker Dictionary (also called "local" dictionary) which is associated to the current edited file, and lists the speakers identified in current file,
- The Global Speaker Dictionary which constitutes a reference of "well-known" speakers, independently from any file, and - depending on TranscriberAG installation and configuration - can be common to all TranscriberAG users or specific for current user.
Both dictionaries are very similar in form and behaviour.
The global dictionary can be opened using <ctrl+g> shortcut, or Speakers > Global speaker dictionary menu option.
The file dictionary can be opened using <shift+alt+g> shortcut, or Speakers > File speaker dictionary menu option, or double-clicking on a turn tag in the text widget of the annotation editor.
Speaker dictionary features are described hereafter.
Screenshot
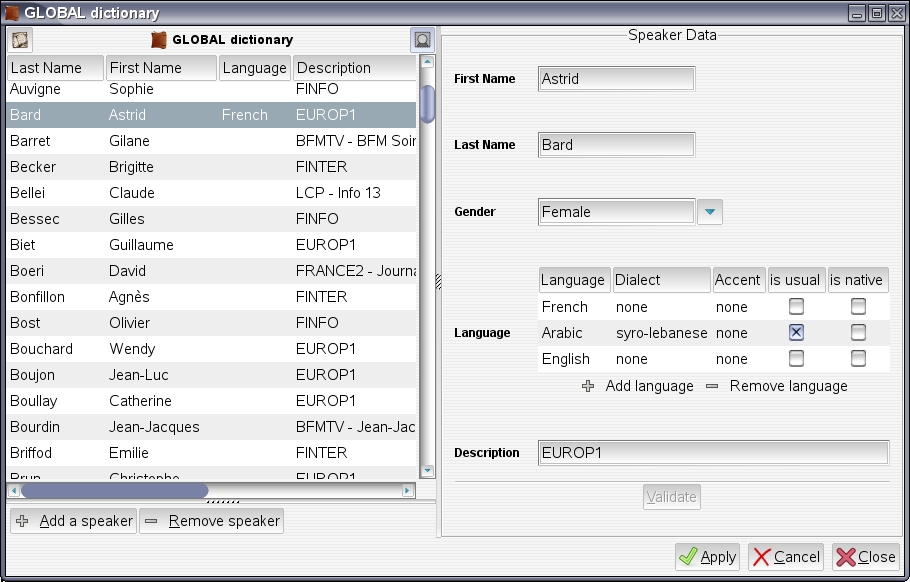
Description
The speaker dictionary windows shows on its left side the list of speakers it contains, and on its right side the details for currently selected speaker.
-
 The Show/Hide details button allows to show or hide speaker details subwindow. By default, speaker details are shown.
-
 The Raise local dictionary button allows to open or raise in foreground the local dictionary, i.e speaker dictionary of current annotation file.
For local dictionary, a similar button is available for opening the global dictionary:
-
 The Raise global dictionary button allows to open or raise in foreground the global dictionary.
Speakers list subwindow
 |
Clicking on any column header allows to sort the list on corresponding item, by ascending alphabetical order.
Browsing through the speakers' list displays details for each speaker in turn in the speaker details subwindow. |
Clicking on Add a speaker button opens speaker details subwindow with empty fields, so that user can fill in new speaker description.
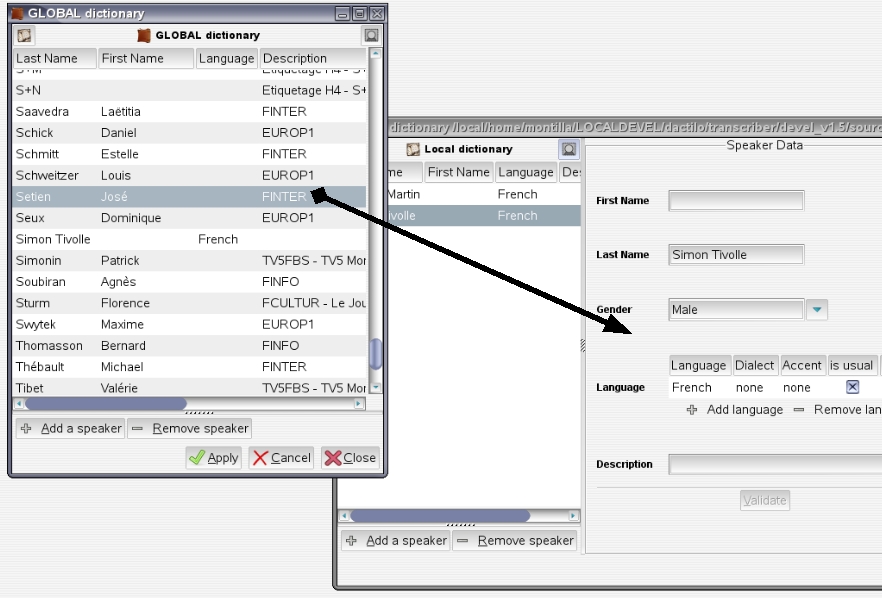
Another way to add a speaker to current dictionary is to drag a speaker entry from another dictionary, and drop it on the current list. This can be used from global to local dictionary, or from local to global (providing current user gives access to global dictionary), or from local to local.
Clicking on the Remove speaker button deletes speaker from the dictionary. If a local dictionary is edited, and if the speaker has associated turns, then removal is prohibited.
Speaker details subwindow
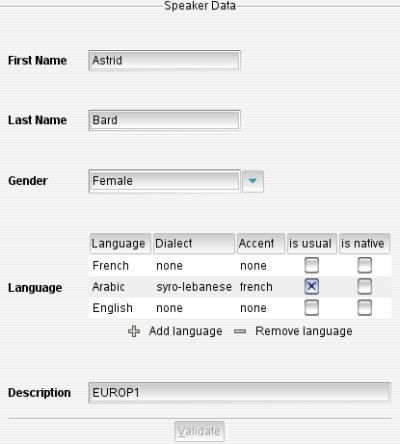 |
The following items can be defined for the current speaker:
WARNING ! Edits are not saved until Validate has been pressed. Thus, if another speaker is selected in the list, edits for the current speaker will be lost. |
When editing a local dictionary, if speaker name or gender has been modified, the turn tags in the text buffer are updated.
Another efficient way to update speaker data, from a global dictionary for instance, is to drag a speaker from the reference dictionary and drop it onto the speakers details subwindow. Current speaker data are then replaced by reference speaker data.
Saving edits
Edits to a local dictionary are saved when the file is saved.
Edits to the global dictionaries are saved when Apply button is pressed. Pressing Cancel cancels all edits and reloads the global dictionary from its last saved state.
Importing a speaker from global dictionary
| The easiest way to import a speaker from the global dictionary to a local dictionary is to open both dictionaries, and to drag and drop selected speaker from global speakers' list onto local speakers' list. Global speaker will then be added to local dictionary. |
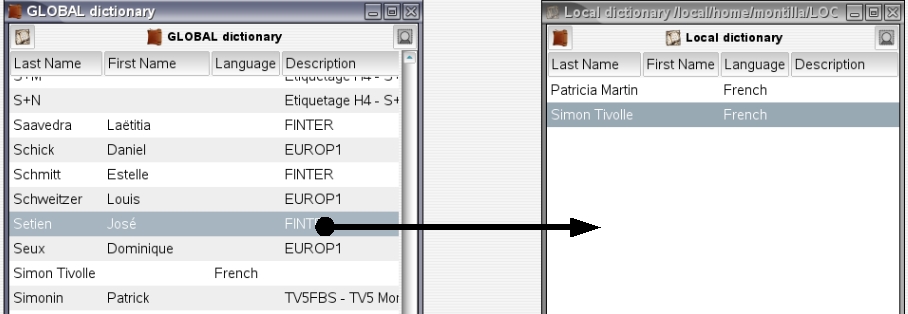
|
Exporting a speaker to global dictionary
| The easiest way to import a speaker from the global dictionary to a local dictionary is to open both dictionaries, and to drag and drop selected speaker from global speakers' list onto local speakers' list. Global speaker will then be added to local dictionary. |

|
Replacing a speaker in local dictionary
| It can happen that a speaker created in local dictionary already exists in global dictionary. As the local speaker has been used in annotation, you don't want to delete it. In this case you can replace the given speaker by the one existing in the global dictionary. For that, just drag and drop the selected speaker from global speakers' list onto corresponding speaker data. |
|
| A confirmation dialog will be prompted and will allow you to cancel or proceed to the action. Note that this action is only available for local dictionary, because the global dictionary is the reference and its speakers should never be replaced by local speakers. |
>> Back to menu
Configuration
Description
This section explains how to customize TranscriberAG.
There are seven configuration tabs:
-
 General Configuration
-
 Transcription Configuration
-
 Text Editor Configuration
-
 Audio Panel Configuration
-
 Video Panel Configuration
-
 Spell Configuration
-
 Speakers Configuration
-
 Look'N'Feel Configuration
General Configuration
The general tab allows to make some basic configuration like defining the user TranscriberAG name, the default html browser, etc.
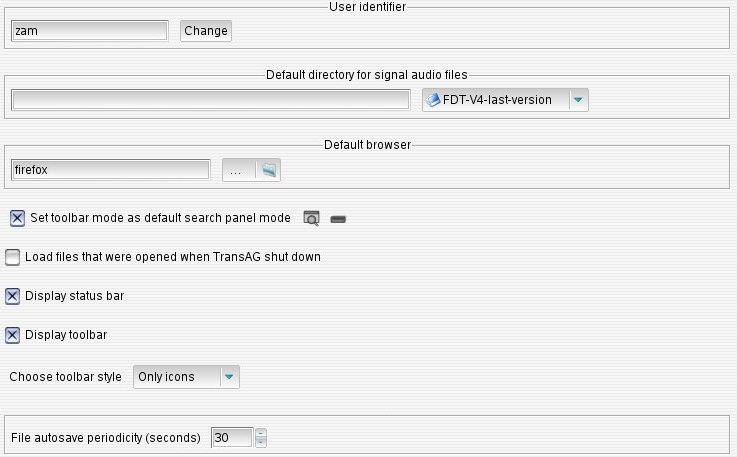
The browser item defines which tool to use to read this manual. Default browser depends on current OS:
- Firefox for Linux,
- Internet Explorer for Windows,
- Safari for MAC OS.
TranscriberAG automatically saves files being edited at a periodicity defined by "File autosave periodicity" item. This allows to recover edits from a rather recent version of the file in case TranscriberAG crashes, and can also allow to revert edits to a previous saved version, using File > Revert file > Revert to autosaved file menu option. Autosaved files are suffixed with a "~" character. They are suppressed when the file is saved by the user.
Transcription Configuration
This tab permits you to define the default language and convention used when creating a transcription.

Transcription Configuration
This tab permits you to define the default language and convention used when creating a transcription.

Text Editor Configuration
Text Editor's tab configures entity's color, suppression shortcuts, synchronization mode, etc.
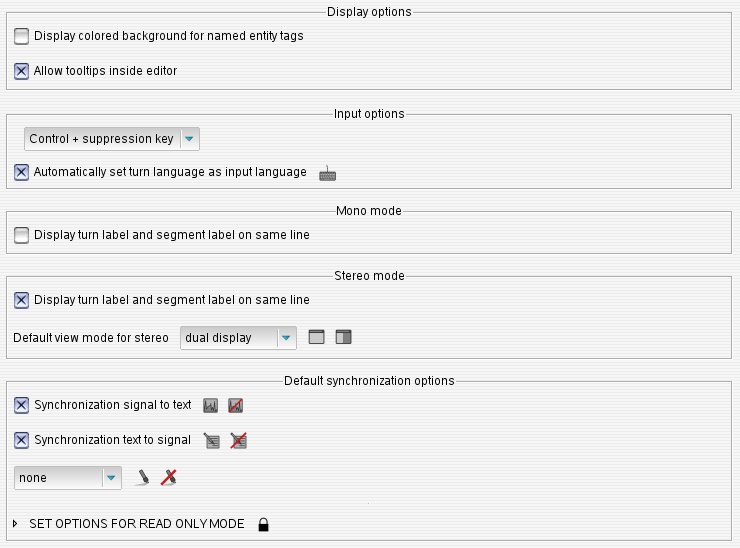
First combo-box in Input options allows to define how segmentation marks can be deleted. <backspace> and <suppr> allow deletion of text, events and entity marks, but it may be undesirable to delete segmentation marks too easily. Segmentation deletion modality can be set to:
- "Control + suppression key": only <ctrl+backspace> and <ctrl+suppr> can delete segmentations marks,
- "Allowed": segmentations marks can be deleted with <backspace> and <suppr>, like text, event and entity marks,
- "Forbidden": segmentations marks deletion is only possible via contextual popup menu.
Audio Configuration
This tab allows to manage the waveform's resolution, the norm used, and some other behaviors.
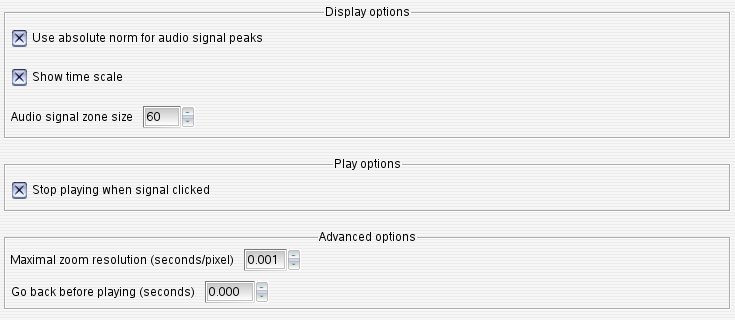
"Audio signal zone size" allow to define waveform display height, in pixels. This value can be changed in the following ways:
- input new size in the widget
- left click on widget controls: on widget controls: increment/decrement by one
- middle click on widget controls: increment/decrement by ten
- right click on widget controls: set to min/max values (10/200)
Video Configuration
This tab allows to manage the number of frames extracted per seconds for the video frame browser.

Spell Checking Configuration
This tab permits to load the default used dictionary.

Speakers Configuration
This panel allows to define the default dictionary speaker.

Look'N'Feel Configuration
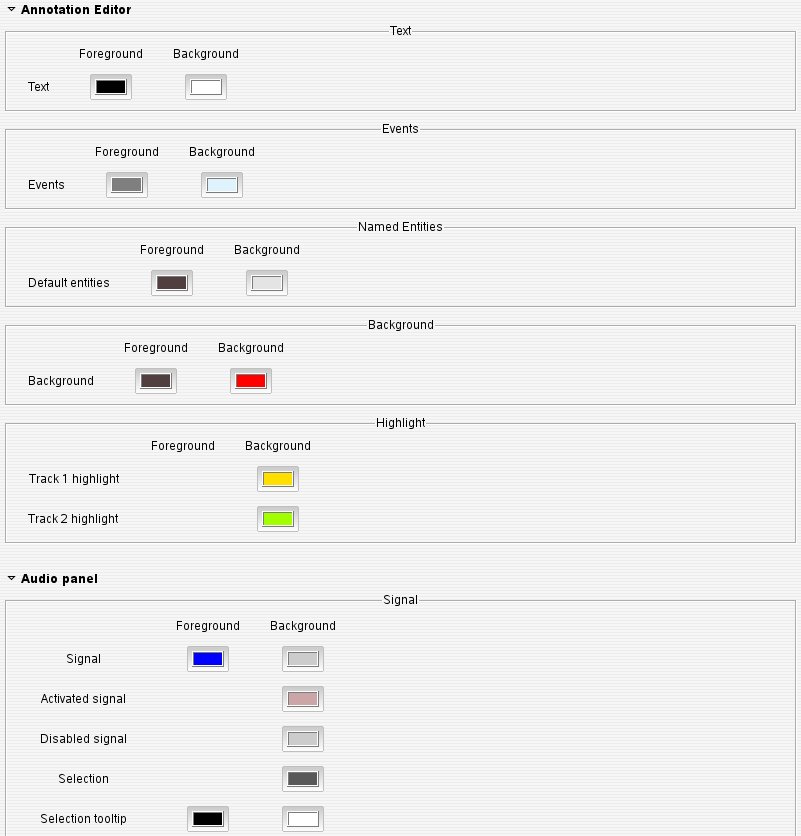
The following picture is the color sub-tab which allows to choose colors for audio and text editor widget:
The following picture is the fonts sub-tab allows to select default font:

>> Back to menu
Shortcuts summary
This is a list of the most common shortcuts used in TranscriberAG:
Keyboard Actions
File Actions
| <ctrl+n> | create a new transcription. |
| <ctrl+o> | open a file. |
| <ctrl+s> | save the currently open annotation file. |
| <ctrl+w> | close the currently open file. |
| <ctrl+q> | quit TranscriberAG. |
| <ctrl+l> / <F5> | refresh editor's display. |
| <F6> | change permission mode (edition allowed / edition locked) |
Edit Actions
| <ctrl+z> | cancel last edit action. |
| <ctrl+y> | restore last 'undone' action. |
| <ctrl+c> | copy selected text in selection buffer. |
| <ctrl+v> | insert selection buffer content at cursor position (main text if selected is discarded). |
| <ctrl+shift+v> | insert selection buffer content at cursor position (buffer can contain tags). |
| <ctrl+x> | erase selected text and copy it in selection buffer. |
| <home> | move text cursor to the start of the line. |
| <end> | move text cursor to the end of the line. |
| <ctrl+home> | move text cursor to the start of the editor. |
| <ctrl+end> | move text cursor to the end of the editor. |
Keyboard Languages
| <shift+ctrl+page_down> | select next keyboard language. |
| <shift+ctrl+page_up> | select previous keyboard language. |
Clipboard Actions
| <alt+shift+c> | display / hide the Clipboard . |
| <alt+up> | select previous entry in the clipboard. |
| <alt+down> | select next entry in the clipboard. |
| <alt+right> | copy selected text to the clipboard ("clipboard import"). |
| <alt+left> | copy selected entry from clipboard at current cursor's position into editor ("clipboard export"). |
| <shift+alt+space> | clear all clipboard entries. |
| <shift+alt+delete> | erase the selected entry from the clipboard. |
Search Actions
| <ctrl+f> | open search panel. (toolbar or dialog, depending on user settings) |
| <ctrl+alt+f> | open special search popup dialog (search by speaker or topic) |
| <F3> | go to next occurrence. |
| <shift + F3> | go to previous occurrence. |
Annotation Actions
| <return> | Insert a new segment boundary for current audio cursor value at current text cursor position. |
| <ctrl+return> | Insert a new timecoded mark at current editor position for current audio cursor, or remove an existing one. The current position can be a text position or a qualifier/foreground event tag. |
| <ctrl+t> | Insert a new turn at current segment start. If a turn already exists at segment start, an overlapping turn will be created, after user confirmation. |
| <ctrl+r> | Insert a new section at current segment start. If no turn exists at segment start, it will be automatically inserted. |
| <ctrl+d> | Insert a new event at current text cursor position. Open a popup menu to let you choose between qualifiers, events and foreground events. Press <Esc> to cancel. |
| <ctrl+e> | Open the entity menu to insert a new named entity at current text cursor position. <Esc> to cancel. |
| <ctrl+b> | Insert a new background starting at current audio widget cursor position. Ending is set either at selection end if any selection active, or at next background segment start (or at signal end if no next background segment) . |
Signal Actions
| <escape> | play/pause the soundtrack. |
| <F4> | skip forward in the soundtrack. |
| <F1> | skip backward in the soundtrack. |
| <F8> | synchronize text cursor with current signal cursor position. |
| <F9> | synchronize signal cursor with current text cursor position. |
| <ctrl+1> | select track 1 : puts the edition cursor to left window. |
| <ctrl+2> | select track 2 : puts the edition cursor to right window. |
Remark: The last two shortcuts don't work with the numeric pad. With an AZERTY keyboard, you should thus use <ctrl+shift+1> and <ctrl+shift+2> (since 1 and 2 keycodes can only be reached using <shift> key)
Video Actions
| <ctrl+F1> | hide video panels |
| <ctrl+F2> | hide video player |
| <ctrl+F3> | hide video browser |
Speaker Actions
| <ctrl+g> | open the global speaker dictionary. |
| <shift+alt+g> | open local speaker dictionary for current file. |
Window Actions
| <ctrl+k> | show or hide the Tool Bar. |
| <ctrl+j> | show or hide the Explorer Tree. |
| <ctrl+m> | show Configuration popup. |
| <ctrl+,> | extend the edition zone. |
| <ctrl+page_up> | move notebook to the previous edited file. |
| <ctrl+page_down> | move notebook to the next edited file. |
| <ctrl+wn> | close current page |
| <shift+alt+c> | display or hide the Clipboard. |
| <shift+alt+f> | open the Annotation File Properties dialog. |
Display Actions
| <F7> | to show (or hide) tags. |
| <F11> | to enable/disable highlight. |
| <F12> | to enable/disable dual display. |
Help Action
| <ctrl+h> | display this manual. |
Mouse Shortcuts
| <middle click> on tab | close tab. |
| <left click>x2 on tab | full screen. |
| <shift+left click> + a signal selection | to extend a selection. |
| <ctrl+left click> + the mouse pointer on the segment boundary | the clicked boundary moves to the previously set cursor position. |
>> Back to menu
